Are Worn Trowels Ruining Your Tile Jobs?
Are Worn Trowels Ruining Your Tile Jobs?
How many notched trowels do you go though on a typical thin-set tile job? It might not be enough.
 According to the National Tile Contractors Association website glossary, the term “thin-set” is used to describe the bonding of tile with suitable materials applied at about 1/8″ (3 mm) thick. These “suitable materials” might be, among others, latex or epoxy-based adhesive, though epoxy is favored for industrial tiling.
“Thin-set adhesive” is also a generic term used to describe tile adhesive applied at about 1/8” (3 mm). This generic term should not be confused with THINSET® brand tile adhesives, which are 100% solids, epoxy-based, thin-set adhesives marketed by Henkel Technologies.
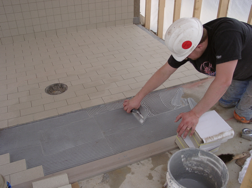
The adhesive application tool of choice is the 1/4″ x 1/4″ (6 mm x 6 mm) notched trowel.
A notched trowel is a flat trowel with serrated edges. A 1/4″ x 1/4″ notched trowel will have 1/4″ gaps between the points of the teeth.
If you looked at the triangle-shaped spaces between the teeth, they would all have 1/4″ base length and 1/4″ height—1/4″ x 1/4″. With use the points on notched trowels get worn. As the points wear down, the thickness of adhesive the trowel leaves on the concrete dwindles.
This little math exercise might explain why theoretical adhesive consumption estimates are often greater than actual consumption. It will also show you how tool wear can really mess up a tile floor.
If you recall your high school geometry, you will remember that the area of a triangle is calculated by multiplying ½ times the base length and the height:
| T = ½ bh, where | T is the area of the triangle |
| b is the base length | |
| h is the height |
The area of each gap between the teeth on a new 1/4″ x 1/4″ notched trowel is
T = 1/2(1/4″)(1/4″), or 0.031 in2
Remember that the objective is to apply a uniform 1/8″ thick setting bed. When you spread adhesive with a notched trowel then flatten all of these little 1/4″ high triangles, you get a bunch of 1/8″ high rectangles side-by-side—a nice, uniform 1/8″ thick setting bed. We can prove this by calculating the area of a rectangle that is 1/8″ wide (equal to the desired setting bed thickness) and 1/4″ long (equal to the length of the base of the triangular notches).
| R = bt, where | R is the area of the rectangle |
| b is the length | |
| t is the width |
R = (1/4″)(1/8″), or 0.031 in2
The area of this 1/8″ tall rectangle is equal to the area of our 1/4″ tall right triangle. This is why you get a uniform 1/8″ setting bed with a new 1/4″ x 1/4″ notched trowel.
What happens when the tips start to wear off as has happened along the top edge of the trowel shown below?

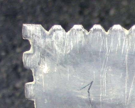
Let’s say you wear about 1/32″ off the tips of your notched trowel. Now the height of the gaps between the teeth is only 7/32″
| h2 = h1 – w, where | h2 is the new notch height |
| h1 is the original height | |
| w is the wear | |
| h2 = 1/4″-1/32″, or 7/32″ |
The length of the gaps between the teeth will shrink from 1/4″ (0.25″) to 0.22″. And now, where there used to be a point, there is a flat stretch (f) 0.031″ long between each notch that drags the concrete.
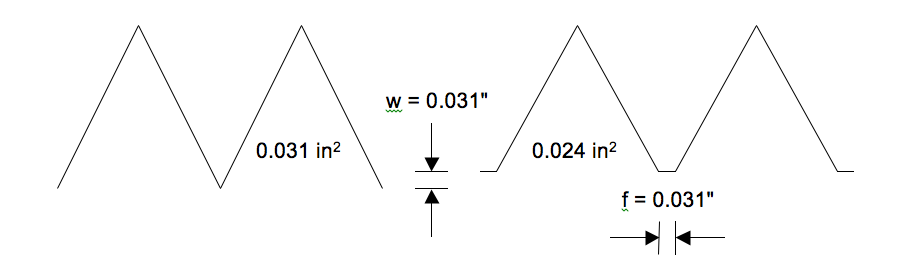
Wearing down the points makes the area of the notches smaller. 1/32″ of wear translates to a notch area 0.024 in2. Even though the base of the triangle-shaped notches gets smaller, the spacing of the notches hasn’t changed. To figure out how this change in the shape of the teeth affects the thickness of the adhesive bed, we have to calculate the height of a rectangle with equivalent area, using the original rectangle length of 1/4″.
| t = R / b, where | R is the area of the rectangle |
| b is the length/td> | |
| t is the width/td> |
t = 0.024 in2 / 0.25″, or 0.096″
So, instead of a 1/8″ (0.125″) setting bed, the setting bed will be 0.096″ thick. This means that a 12.5% loss of notch height—1/32″ off of 1/4″—results in a 23% reduction in setting be thickness. If we double that wear to 1/16″, the membrane thickness is only 56% of the desired thickness (1/8″).
A little bit of notch wear can lead to a big loss of adhesive thickness. Monitor tool wear to make sure the points on your notched trowels are sharp, and replace them as needed. A drop in adhesive consumption rates might also indicate tool wear problems, but a problem with one laborer’s trowel could get lost in the average adhesive consumption of the crew. It’s best to inspect individual hand tools routinely and toss the old ones to avoid problems.
Industrial tile flooring performance depends upon many factors including the use of good quality adhesive, thorough surface preparation, and use of strong substrate materials. The more contact surface area between the tiles and adhesive, the better the tiles will resist impact loads and thermal shock. If there is not enough adhesive on the substrate during installation, performance problems such as cracked or disbonded tiles are sure to follow.